


You’ve just sketched out a brilliant idea for a medical device. Maybe it’s a surgical tool with a redesigned grip that makes a routine procedure smoother, or a wearable patient monitor that provides real-time insights.
But taking that initial concept from a sketch to a functional product that clinicians use means clearing regulatory reviews. Skipping steps raises the risk of a recall, and design flaws are the largest single cause behind nearly a third of high-risk medical device recalls.
Medical prototypes exist to catch flaws early in the product development process, when it’s fast to fix and before the device reaches a patient whose safety depends on it. In this post, we’ll cover how medical device prototyping works and some real-life examples of medical device prototypes.
Table of Contents
What Is Medical Device Prototyping?
Medical device prototyping is the process of creating a digital or physical three-dimensional model of your medical device concept. Medical prototyping allows you to tangibly visualize your design, test its functionality in a simulated environment, and gather feedback from potential users and stakeholders.
Part of medical prototype development is also deciding how much fidelity you need at each stage, which is how closely a prototype looks or functions like the final product. A rougher, cheaper prototype is often the right call early on, while a higher-fidelity model becomes a better investment as the design nears the final stages.
Here are some examples of types of prototypes used for medical devices:
- A mobile app that uses a phone’s camera to monitor chronic skin conditions and lets patients track progress at home.
- A foam prototype of a new grip design for a surgical tool that allows the team to assess comfort and maneuverability before investing in a more complex model.
- A 3D-printed model of a custom dental implant that enables precise pre-surgical planning and ensures a perfect fit before manufacturing the actual implant.
- A wearable patch prototype for continuous glucose monitoring that’s used to test comfort and skin adhesion before finalizing the sensor design.
These examples span a wide range of fidelity. A foam mockup is low-fidelity because it’s quick, cheap, and built to test a specific user experience, like grip comfort. A 3D-printed dental implant model is high-fidelity. It’s closer to the final product and more expensive to produce, but that precision matters when an implant has to fit a patient’s anatomy exactly.

Common Prototyping Methods and Materials
How detailed and polished a prototype needs to be determines which method makes sense. Below are the most common approaches, along with the materials typically used for each.

Proof-Of-Concept Prototypes
Proof-of-concept prototypes are the lowest-fidelity stage, existing to answer if the core idea even works. At this stage, teams often turn to stereolithography (SLA) or selective laser sintering (SLS) 3D printing, which builds parts in layers from resin or nylon powder. They might also use Fused Deposition Modeling (FDM), which instead uses plastic filament. These methods are ideal for testing complex geometries, such as patient-specific anatomical models, because they’re fast and inexpensive.
Looks-Like Prototypes
Looks-like prototypes step up in appearance and ergonomics fidelity, without necessarily matching final function yet. Teams often create 3D printing or cosmetic models to evaluate Color, Material, and Finish (CMF) and realistic form factors to test the usability.
Works-Like Prototypes
Works-like prototypes raise fidelity further, holding tight tolerances and performing closer to production. Computer numerical control (CNC) machining, which cuts a part from a solid block of medical-grade plastic or metal, is the go-to method here. CNC lets teams test fit and function with materials closer to the final device.
Production-Intent Prototypes
Production-intent prototypes sit at the highest fidelity, as close to the final device as it gets before tooling is locked in. Urethane or injection casting, where a silicone mold cast from a pattern produces parts, is common for clinical evaluation batches. For larger devices such as lab equipment housings, aluminum or steel sheet-metal fabrication produces durable enclosures ready for structural and electromagnetic interference (EMI) testing.
How Does Medical Device Prototyping Work?
Medical device prototyping is an iterative process that involves translating a concept into a physical model. Here’s a simplified overview of the process.
1. Creating the Concept
A team of healthcare professionals and engineers identifies a specific medical need. That need might come from a clinician noticing a gap in day-to-day care, or the engineering team spotting a technical capability that could improve healthcare equipment. From there, the team narrows the idea down to a specific, addressable problem, such as a cumbersome diagnostic procedure or a lack of user-friendly treatment options.
Through in-depth research, they explore existing solutions and brainstorm possibilities for a more efficient, user-friendly, or cost-effective approach.
For example, a group of doctors might recognize a need for better monitoring of patients in remote areas. They brainstorm and research, leading to the idea of a wearable device called Vitality Pro that can track vital signs and send data to healthcare providers in real time.
2. Design and Engineering
In the product design stage, engineers translate the team’s ideas into detailed technical drawings while considering material selection, functionality, and user comfort.
Human factors design prioritizes ergonomics and intuitive design to ensure the device is comfortable and easy for healthcare professionals and patients to use in real-world settings, while ensuring it performs its intended tasks effectively.
Engineers also consider safety and regulatory compliance as part of their process, including biocompatibility standards such as ISO 10993 and the chemical compatibility of plastics that may be exposed to alcohol or other cleaning chemicals during regular wipe-downs.
For example, based on the doctors’ concept, engineers create detailed sketches and 3D models of Vitality Pro. They take into account size, weight, comfort, and battery life while specifying the type of sensors needed to track vital signs and the communication technology for data transmission.
3. Fabricating the Prototype
With a blueprint in hand, it’s time to fabricate the prototype. This initial model may not be perfect aesthetically, but it’s a starting point. Teams can employ techniques such as 3D printing, machining, or the use of readily available components to build a tangible model.
The focus at this stage is on functionality. You need to test the device’s core functionalities to see if it performs as intended. This allows the team to identify any potential flaws or areas for improvement before investing significant resources in a polished final product.
For example, using SLA 3D printing, the prototyping engineers create a prototype casing for Vitality Pro. Electronic components like sensors and microprocessors are sourced and assembled following the engineering plans.
4. User Testing and Evaluation
Once assembled, healthcare professionals and potential patients or focus groups rigorously evaluate the prototype in simulated or controlled environments.
This stage is all about gathering valuable feedback on the product’s features, such as the:
- User interface, like how intuitive the controls and displays are.
- Usability, such as how comfortable and easy the device is to use.
- Performance, specifically how accurate and reliable the device is.
- Effectiveness, namely, if the device achieves what it’s designed for.
The feedback then informs the iterative refinement stage, during which the team makes changes based on the test results.
This process can span months or even years in large medical companies, longer than typical consumer product design testing, since it often requires Institutional Review Board (IRB) approval and formal clinical protocols before a test subject can be enrolled. It also often involves a global network of test subjects to ensure the device works across different populations.
For example, the Vitality Pro undergoes simulated scenarios where volunteers wear it while the development team evaluates its accuracy in measuring vital signs. They assess factors like user comfort, battery life, and data transmission reliability during simulated use and record their findings for later refinement.
5. Iterative Refinement
Iterative refinement is a crucial stage in the medical device design process where the prototype undergoes continuous improvement based on real-world testing and feedback. Think of it like sculpting a piece of clay — with each iteration, you remove imperfections and refine the shape until you achieve the desired form.
Each round often means re-checking the change against the same internal design and regulatory standards that the earlier version was tested against. That documentation and reiteration add up, which is part of why creating medical devices requires a significant investment in budget and time.
For example, based on test results, the engineers might adjust the design of the Vitality Pro to improve comfort by making it lighter or redesigning the casing for a better fit. Adjusting the casing may require rerunning internal biocompatibility and usability checks, even for a change this small.
6. Verification and Validation
This is the final round of rigorous testing to confirm your medical device meets the specified design requirements and functions as intended before moving into regulatory submission.
The verification process ensures that the prototype is made according to the established specifications, while validation confirms it performs correctly in real-world conditions. This comprehensive testing process helps identify and fix any discrepancies or issues before moving forward with production.
For example, once the company has the final Vitality Pro product ready, it’s time for one last test. The company may hire people or gather volunteers to wear the device to ensure it is functional and ready for the final stages.
7. Regulatory Compliance
Before reaching the target market (patients, doctors, or medical institutions), the device needs a green light from regulatory bodies. These agencies, such as the U.S. Food and Drug Administration (FDA), exist to safeguard patient safety and ensure medical devices are effective. How much regulatory rigor a device needs also depends on its classification. The FDA sorts devices into Class I, II, or III based on risk, with a simple bandage in Class I facing far less scrutiny than an implantable device in Class III.
The prototype is assessed against established laws, regulations, and policies. This might involve documentation review and rigorous material testing to confirm biocompatibility, often against a standard like ISO 10993, along with adherence to a quality management system such as ISO 13485.
For example, the Vitality Pro might need 510(k) clearances from the FDA before it’s ready to sell.
8. Assembly and Integration
The next stage involves assembly and integration. This is like putting together a puzzle and carefully assembling the various parts to ensure seamless operation. Here, the engineering team verifies that all components work together effectively without technical glitches and notes how long it would take to assemble. This meticulous assembly ensures the final device functions as a cohesive unit.
Throughout this stage, the team should also keep a record of what was assembled, when, and by whom. That documentation matters for any medical prototype design heading toward FDA submissions and other regulatory reviews. Create a traceable build history that regulators expect to see to ensure smooth final processing.
For example, the engineering team brings Vitality Pro to life by assembling its various components. The 3D-printed casing, designed for comfort and a snug fit, becomes the foundation. Tiny sensors for heart rate and temperature, which serve as the device’s eyes and ears, are strategically placed within the casing. The team then integrates the microprocessor, the brain of Vitality Pro, which processes the raw data collected by the sensors and prepares it for transmission.
9. Getting Ready for Production
With the prototype perfected and regulatory hurdles cleared, it’s time to bring the vision to life. Production processes should be meticulously planned and optimized for larger quantities. This involves selecting the most efficient manufacturing techniques and establishing robust quality control measures to ensure the best customer experience.
For example, the company might settle for the printed electronics manufacturing technique, which involves printing electrical circuits directly onto flexible substrates. It’s ideal for creating lightweight and comfortable wearable devices like the Vitality Pro.

Key Considerations When Developing a Medical Device
Let’s explore some important considerations to ensure your prototyping experience goes smoothly.
- Market analysis: Conducting thorough market research helps determine the viability of your concept. This analysis identifies potential competitors and assesses the overall market size to ensure your device fills a real gap in the healthcare landscape.
- Cost and budget: Medical device prototyping can involve varying costs depending on the complexity of your design and the chosen methods. Be sure to factor in all potential costs upfront, including materials, labor, and testing. Many medical device prototyping companies offer flexible solutions to fit your budget without compromising quality.
- Intellectual property (IP) protection: Consider safeguarding your innovative idea. Securing patents or other forms of intellectual property protection can be crucial to preventing unauthorized use of your design.
- Regulatory and safety compliance: Before you start, understand which regulatory pathway applies to your device’s classification, as that determines the fidelity and materials your prototype requires.
- Human factors and usability testing: Testing is an ongoing commitment throughout the entire device lifecycle. Ask a potential partner who they test with and how to gauge the rigor of their quality control.
- Selecting the right partner: Choosing the right prototyping partner for your medical device journey is crucial. Look for a company with experience developing medical devices and a strong understanding of the regulatory landscape.
Examples of Medical Device Projects Shaped by Prototyping
Here at StudioRed, we’ve had the privilege of collaborating with clients on a variety of medical equipment prototypes. Our case studies showcase how real prototypes paved the way for successful medical products.
Labcyte

StudioRed partnered with Labcyte to develop the Labcyte Access Dual Robot System (DRS). This automated high-throughput platform integrates acoustic liquid dispensing technology that makes managing and storing lab samples much easier for laboratories.
Here’s how StudioRed helped Labcyte:
- Ergonomic design: We used anthropometric data to ensure the Access DRS met ergonomic standards and user comfort during operation and maintenance, including considerations for body positioning, shelf access, and the need for step stools.
- User interface considerations: We incorporated easy access for programming and servicing devices and positioned alert lights for optimal visibility from all angles.
- Modular design: We designed a modular system with user-friendly features and minimal parts.
- Custom component sourcing: Our engineering team sourced and specified custom environmental control ports for the robot arms, finding a creative solution for technical challenges.
Medtronic
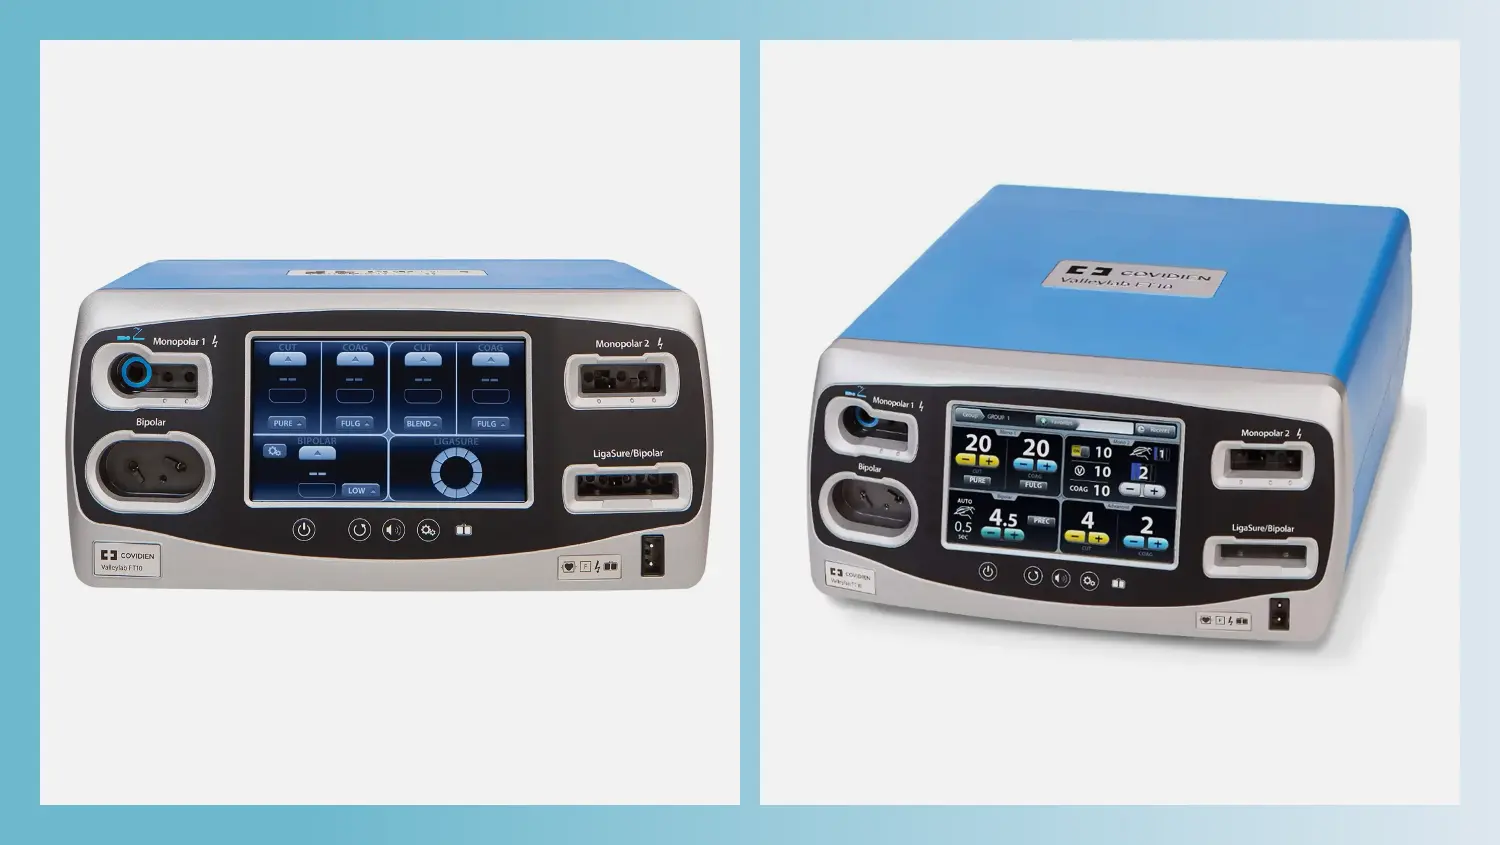
The Valleylab™ FT10 is an advanced surgical tool that uses precise electric cuts to minimize complications during surgery. It’s like a super-smart scalpel that ensures a clean and consistent cut. Our team was involved in designing the physical form and user interface of the Valleylab™ FT10.
GE Carescape

The GE CARESCAPE Central Station is a clinician-facing patient monitoring workstation used in hospitals worldwide. StudioRed engineered a fanless thermal solution for the system, using thermal modeling to confirm that heat sinks could keep components within safe limits.
The product is designed to scale into three configurations from a shared set of parts. Before tooling began, we CNC-machined prototype units in production-equivalent materials to test assembly tolerances, structure, and EMI, thermal, and water-ingress performance.
Build Your Medical Prototype With StudioRed
Every medical device on the market today started as a prototype, and the ones that manage to save lives are the ones that got the prototyping process right. Medical prototypes give you the chance to catch design flaws and test safety before problems reach regulators and patients.
StudioRed has spent decades building prototypes for medical devices and helping teams move from an early concept to a product ready for FDA review. When you’re ready to turn your innovative medical device concept into reality, contact us today and let our team of experienced industrial designers help you through the process.
Medical Prototypes FAQ
What Are the Types of Medical Device Prototypes?
Medical device prototypes generally fall into four stages of fidelity: proof-of-concept, looks-like, works-like, and production-intent. Each stage tests something different, and teams typically move through all four before a device reaches production. The process goes from testing whether an idea works at all to whether the final design is ready for regulatory submission.
What Regulatory Standards Apply to Medical Device Prototypes?
The most common standards include ISO 10993 for biocompatibility and ISO 13485 for quality management. FDA design controls, the formal design and documentation requirements laid out in 21 CFR 820.30, also apply once a device reaches later-stage prototyping. Which standards apply, and how strictly, depends on your device’s risk classification between Class I, II, or III.
What Manufacturing Methods Are Used to Build Medical Device Prototypes?
The most common manufacturing methods are SLA and SLS 3D printing for early models, CNC machining for higher-fidelity prototypes requiring tight tolerances, and urethane casting or sheet-metal fabrication for production-intent builds. Which method makes sense depends on the prototype’s fidelity stage and the device’s final materials.
How Long Does It Take to Prototype a Medical Device?
Prototyping a medical device can take anywhere from a few weeks for an early proof-of-concept model to a year or more for a production-intent prototype. It depends on the device’s complexity and risk classification. More complex or higher-risk devices generally require more iteration and more rigorous testing at each stage, which adds time.


